
Shop Now
From Our Blog
-
FURY MPST Series: How-To Videos
Video guides for Weldclass FURY MPST Series MIG/TIG/Stick Pulse welding machines. -
What is a Pulse MIG? A how & why guide to Pulse MIG welding
The how, what and why guide to pulse MIG welding


User Guide - 290MST, 350MST & 395MST
The complete operators guide for 290MST, 350MST and 395MST

1. Initial Set Up [IMPORTANT!]
When setting up your new welder for the first time, you must make the following changes and checks before using the machine.
Torch Liner:

The MIG torch supplied with your machine is factory-fitted with a steel 0.9-1.2mm 'red' liner.
If you are welding with Aluminium wire, this steel liner should be removed & replaced with the polymer/teflon liner. See our range of liners Click Here
How to fit teflon (aluminium) liners
Drive Roller:
Your machine is factory-fitted with a V-groove roller for 0.9/1.2mm steel. If you are welding Aluminium, this should be removed & replaced with the U-groove 1.0/1.2mm aluminium drive rollers. See #4 below for more information on drive rollers.
Contact Tip:
You will likely need to replace the contact tip in the torch, with the correct size tip to match the wire you are using. An assortment of tip sizes are supplied with the machine. See #7 below for more information on contact tips.
MIG Torch:
Your machine is supplied with a BZL 36 series torch. See #8 below for more details on torch operation.
Additional torch? If you frequently weld steel or stainless but also want to occasionally weld with aluminium, you may want to consider purchasing an additional torch for aluminium work. This will avoid the inconvenience of having to change liners in the torch. We recommend the Weldclass Promax BZL 36 3m torch as your additional Aluminium torch, fitted with a universal aluminium liner.
Earth Clamp & Lead:
Ensure that the clamp is very firmly fitted to the earth cable. This is essential for successful welding. See #11 below for more information.
2. Material Thickness & Wire Size [IMPORTANT!]
Material Thickness
When considering material thickness, it is important to understand:
- The material thickness selection in your machine program settings are approximate guide only. Every application is different, and in some cases, it may be necessary to dial up either a higher or lower setting vs the actual material thickness being welded
- The 'maximum weldable thickness' will be less in pulse modes (395MST only) than in non-pulse modes. This is because pulse is more complex than conventional MIG, with multiple current levels, and requires more power than conventional MIG to weld the same material thickness.
- Maximum thickness capacity will vary depending on the application. One important factor is 'heat sink'. Larger workpieces / components absorb more heat (especially aluminium which is a very good thermal conductor), which means more/higher current is required, which then reduces the maximum weldable thickness.
Approximate Material Thickness Guide
290MST
|
Wires → |
Aluminium |
Stainless-Steel |
Mild Steel |
Bronze |
|
Manual |
3-8mm |
0.5-8mm |
0.5-10mm |
0.5-5mm |
|
Synergic |
1*-5mm |
0.5-5mm |
0.5-5mm |
0.5-5mm |
350MST
|
Wires → |
Aluminium |
Stainless-Steel |
Mild Steel |
Bronze |
|
Manual |
3-10mm |
0.8-10mm |
0.9-12mm |
0.6-8mm |
|
Synergic |
1*-8mm |
0.8-9mm |
0.9-8mm |
0.6-4.2mm |
395MST
|
Wires → |
Aluminium |
Stainless-Steel |
Mild Steel |
Bronze |
|
Pulse |
0.8-6mm |
0.8-10mm |
0.8-10 |
0.8-5mm |
|
Manual |
3-8mm |
0.5-8mm |
0.5-14mm |
0.5-5mm |
|
Synergic |
1*-9mm |
1-10.5mm |
1-9.5mm |
0.7-3.6mm |
* Welding very thin aluminium (less than 2-3mm) is challenging and requires higher levels of experience and skill.
Aluminium Wire [AlMg]
Being a soft metal, wire feeding with aluminium can be challenging.
Even if you are welding thinner material, there is rarely any need to choose wire smaller than ø1.0mm. This is especially the case with Pulse MIG (395MST only), which allows the welding of thin materials on larger-diameter wires.
Avoid using ø0.9mm wire where possible, and especially avoid ø0.8mm which can be extremely difficult to wire feed.
Stainless Steel Wire [Ss]
Your machine has programs for running 0.9mm, 1.0mm, 1.2mm & 1.6mm stainless wires.
Steel Wire [Fe]
Synergic MIG mode has programs for 0.6mm, 0.8mm, 0.9mm, 1.0mm, 1.2mm & 1.6mm steel wire.
Silicon Bronze [CuSi3] & Aluminium Bronze [CuAl8] Wire
Your machine has programs for running 1.0mm bronze wires.
3. Spool Hub Set Up
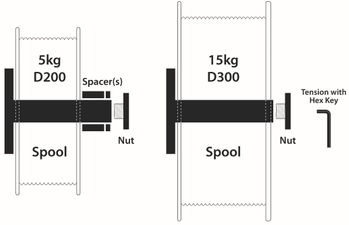
- Install with spool as shown above
- For 200mm / 5kg spools, use spacer(s) as shown above. Use one or both spacers as required, depending on spool width
- Set correct tension on the spool, using hex key. The Spool tension should be enough to brake the spool & prevent free-wheeling. Do NOT over-tighten, as this will put undue strain on the drive system
4. Drive Roller Selection
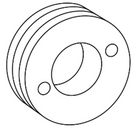
It is important to select the right drive roller type to match the wire you are using.
Aluminium wires: Use U-groove roller (a v-groove roller will squash softer Aluminium wire out of shape).
Solid Steel & Stainless wires: Use V-groove roller.
Bronze ("brazing") wires: Use with V-groove rollers.
Your machine is factory-fitted with a V-groove roller. If you are welding aluminium, you will need to remove this & replace it with the the U-groove roller supplied with the machine.
See a full listing of Drive Rollers available here
5. Drive Roller Alignment [IMPORTANT!]
Each drive roller will have two grooves for different wire sizes. Make sure that the drive roller is installed so that the groove being used is the correct size for the wire size you are using.
VERY IMPORTANT:
Make certain that the wire is sitting directly & firmly inside the groove in the roller, before closing/locking the tension arm.

Check the Inlet Guide Tube shown below. If this is slightly crooked, it will prevent the wire from aligning precisely with the drive roller groove. You may find it easier to sight wire alignment by using the camera on your phone.
If guide tube / wire is mis-aligned: Loosen the retaining screw, remove the Inlet Guide Tube, clean the guide tube and its locating hole to remove any dirt/debris, then replace and check alignment again.
6. Wire Feed Tension Arm
Tension should be enough to maintain consistent wire feed with no drive roller slippage, but no more.
Avoid the temptation to wind up / increase the tension as "instant fix" for wire feed issues. Excessive feed tension will not only cause premature wear of the drive roller, bearings and motor/gearbox - but it can also 'squash' the wire out of shape and make the problem worse. If wire is not feeding correctly, check for all other causes (as listed in this guide) first.
7. Contact Tips
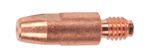
Ensure that the contact tip in the torch is the correct size for the wire you are using.
Aluminium wire requires slightly "over size" tips. These will usually be available as a specific aluminium tip. For example a 1.0mm aluminium tip will be marked as "1.0A" or "1.0ALU".
Sometimes it may also be necessary to use an over-size tip for steel and stainless wire, especially if wire jamming occurs when the torch becomes hot. This is often because the heat causes the wire and the tip to expand (which shrinks the hole in the tip). Using an slightly oversize tip can prevent this. Use an 'aluminium' tip, or go up one tip size (eg: for 0.9mm wire, use a 1.0mm tip).
If the contact tip is worn (or is too large), this will result in wire arcing out inside the tip, causing wire jamming. If this is occuring replace the tip.
8. MIG Torch
Your machine is supplied as standard with a BZL 36 series 4m torch
Torch Consumables: Click here to view all BZL 36 torch consumables
Additional torch? If you frequently weld steel/stainless but also want to occasionally weld with aluminium, you may want to consider purchasing an additional torch for aluminium. This will avoid the inconvenience of having to change liners in the torch. We recommend the Weldclass Promax BZL 36 3m torch as your additional Aluminium torch.
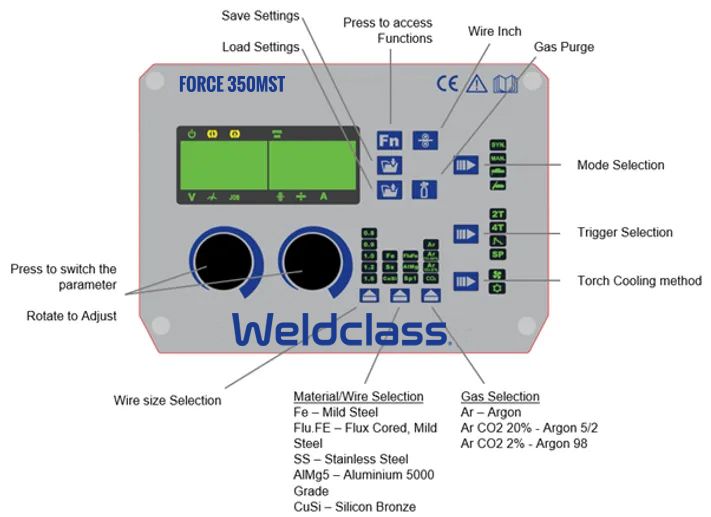
9. Controls, Modes & Settings [Popular]
Control Panel 290MST and 350MST
Control Panel 395MST
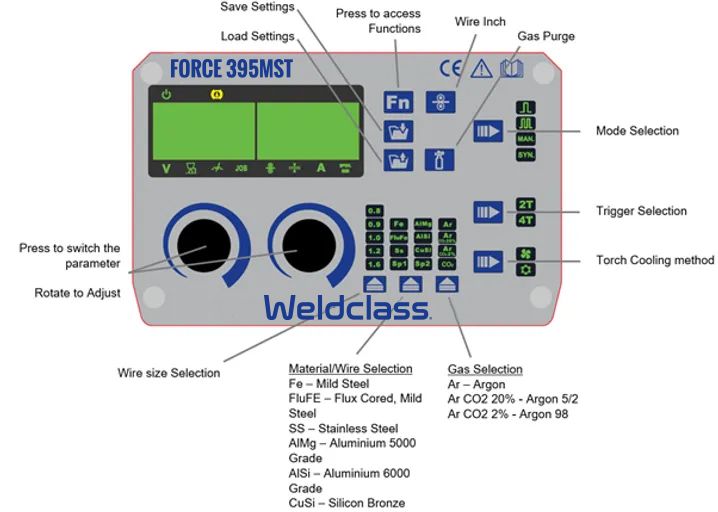
MIG Functions & Settings:
Syn. (MIG Synergic)
Machines with Synergic controls are pre-programmed with intelligent data that allows the operator to first select the wire type/size, material type and gas type, and the machine will then automatically adjust voltage and amps/wire speed together based on the material thickness selected.
When operating in Synergic mode, the right-hand dial adjusts the preset material thickness parameter. The left-hand dial provides voltage trim to optimise arc performance.
Man. (MIG Manual)
Conventional MIG mode, where Voltage & Wire Speed (amps) are set independently.
Single Pulse (395MST only)
This allows you to use preset single pulse settings with no adjustment.
Double Pulse (395MST only)
This setting allows you to adjust the Pulse Balance and Duty for greater control of your weld.
Current
Output in amps. Note that (with exception of manual mode), Current, Wire Speed, Voltage & Material Thickness are all linked and will be simultaneously adjusted when one setting is changed.
Wire Speed
This displays the wire speed setting in meters per minute.

Material Thickness
This adjusts the machine to use the preset settings based on your selection of wire thinkness, wire/material type and gas. Rotate the right control knob to increase or decrease the setting to our material. If this light is not light on, press the right control knob to browse to this setting.

PrG - Pre-Gas Time (sec)
Adjusts 'delay' time from when trigger is pulled and arc/wire-feed starts, to ensure effective gas coverage and prevent porosity etc at the start of the weld.
PoG - Post-Gas Time (sec)
Adjust time that gas continues to flow after welding stops, to ensure effective gas coverage and prevent porosity etc at the end of the weld.
SFt - Soft Start Adjustment
Available in Manual MIG mode only*. When a weld is started, the workpiece and the wire will be cold compared to welding temperature, and if full wire speed is applied immediately this can cause an uneven and poor start to the weld. To prevent this, Soft-Start gradually accelerates wire speed at the start of the weld. If you find the wire ‘bumping’ the workpiece before the arc is fully established, try increasing Soft-Start setting. Adjustable from 1-100%.
bUb - Burnback Adjustment
Burnback adjustment controls brief time that the wire feed will continue after the trigger is released and welding current stops. If wire feed and current stop at exactly the same time, the wire will still be hot and will ‘burn back' and stick to the tip. If this is occuring, increase burnback. If the burnback is too high, this will leave excessive wire ‘stick out’ that will need to be corrected before starting the next weld. Adjustable from 0-1.0sec, in 0.01s increments.
SPt - Spot/Stitch Weld Time (sec)
Used in Spot trigger mode. Adjusts duration of spot welding arc time. Adjustable from 0-1.0sec, in 0.01s increments.
GAP - Stitch Weld Gap/Interval Time (sec)
SPo - Spool Gun (On/Off)
bAl – Double Pulse base Arc Length
FdP – Double Pulse Frequency
Range: 0.5-3Hz
Dut – Double Pulse Duty
Range: 20-80%
Inductance
Available in Manual, Synergic. In some respects, inductance is like adjusting the nozzle on a garden hose. Low inductance = wide, smooth, fluid arc, can reduce spatter and improve weld appearance. High inductance = narrow, focused, crisp arc which can increase spatter levels, but in some applications (especially thinner materials) allows a tighter 'pin point' weld bead. Adjustable from -50% to +50%.

10. Power Supply
290MST:
The 290MST is factory fitted with heavy-duty 15A plug, for commissioning purposes and use with 15A input mode. To obtain full / maximum output, fit & use with single-phase 32A plug / power supply.
To change from 15A to 32A mode:,
- Turn machine off and allow machine to power down
- Press and continue to hold BOTH control knobs while switching the machine back on
- Continue to hold BOTH control knobs until the screen displays 32A*
To change from 32A to 15A input mode:
- Power machine on
- Press BOTH control knobs until the screen displays 15A
*If your machine displays 35A, select this for 32A mode. This is a minor display error which affects some 290MST machines, and will not change or affect the performance of the machine in any way.
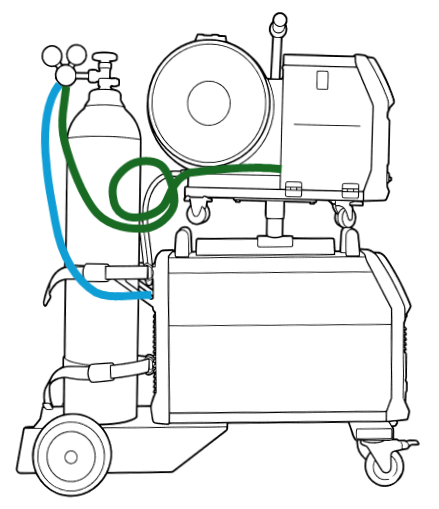
11. Gas Connections
290MST & 350MST Compact (Shown in Blue below)
The gas connects to the rear of the machine via the quick connection. This supplies gas to both the MIG Torch (via the euro connection) and the TIG Torch (via the female quick connection on the front of the machine)
290MST, 350MST and 395MST Wire Feeder (Shown in Green below)
The gas is supplied via the innerconnecting lead set directly to the Wire Feeder via the quick connector in the right hand side access door. This supplies gas to the MIG Torch (via the euro connection) only.
Note: The Red and Blue quick connectors on the front of the Wire Feeder are for water cooled TIG and MIG Torchs.
12. Trigger Modes
2T
Pull & hold trigger to start & continue welding
Release to initiate end slope/current
4T
> Pull trigger to start welding
> Release the trigger while welding
> Pull the trigger
> Release to stop the weld
4T Special
> Pull & hold trigger during start current
> Release when main current begins*
> Pull & hold to start end slope/current
> Release when welding stops**
*Or release during start current/slope to skip immediately to main current.
**Or release during end slope/current to immediately stop welding.

13. Dos & Don'ts [IMPORTANT!]
Clean materials thoroughly before welding:
Always clean the base material thoroughly before welding. Any oxide on the aluminum surface should be removed with a stainless-steel wire brush
Push Technique:
Use push (rather than drag) torch technique
Earth and Cables:
For successful pulse welding (395MST only), it is absolutely critical that there is no disruption or "leakage" anywhere along the current path. This is the #1 cause of malfunctions with pulse MIG welding, and is the first thing you should check if you are experiencing problems.
- Earth clamp must be in good condition and firmly fixed to the cable with no loose parts.
- If your earth clamp needs to be replaced, our #1 recommendation is the Platinum EC500H Heavy-Duty Earth Clamp
- Cables must be in good condition: No worn insulation or exposed copper wire
- Torch must be in good condition
- Check that that all connections (for torch & cables) are tight/firm
- Where possible attach the earth clamp directly onto the job / workpiece, as close to the weld zone as possible.
- Avoid excessively long earth cables (ideally not more than 4m)
- Keep torch and earth cables as straight as possible and avoid excessive coiling
14. MMA (Stick)
In MMA (stick welding) mode, your machine is suitable for running most types of common electrodes up to 4.0mm.
A stick welding lead (Weldclass part number WC-06233) will be required to set up your machine for stick welding.
MMA adjustments:
Main current: Set as per material you are welding.
|
Machine ↓ |
Max Output |
|
290MST |
270amps |
|
350MST |
350amps |
|
395MST |
400amps |
Hot Start: Provides extra power/current when the weld starts to overcome the high resistance between the electrode and workpiece as the arc is started. It makes igniting the electrode easier and prevents it from sticking when cold. Adjustable from 0 – 100%, as a percentage of main welding current (up to max 160A).
Arc Force: Boosts the welding power if the machine senses the welding voltage is getting too low to assist with maintaining & stabilising the arc. The higher the arc force adjustment, the higher the minimum voltage that the power source will allow. 0% is Arc Force off, and 100% is the maximum Arc Force. Useful for electrode types with a higher operating voltage requirement or joint types requiring a short arc length such as out-of-position welds.
15. TIG
In TIG mode, your machine is suitable for trigger activated "Lift-Arc" DC TIG welding of mild-steel, stainless-steel, copper and chrome-molly.
A TIG welding torch is required to set up your machine for TIG welding. Compatible Weldclass TIG torch models are 17FV series with trigger and amperage controls.
Note that your machine is NOT suitable for TIG welding of aluminium, as this requires machines with AC/DC TIG function.
16. ERROR CODES
| Error code | Description |
| E01 to E04 | Over-heating (main inverter block) |
| E09 | Over-heating (Program in default) |
| E10 | Imput power fault - Missing Phase |
| E11 | No water, or set to water cooler mode without watercooler attached. |
| E12 | No gas |
| E13 | Under voltage |
| E14 | Over voltage |
| E15 | Over current |
| E16 | Wire feeder over load |
| E20 | Button fault on operating panel when switch on the machine |
| E21 | Other faults on operating panel when switch on the machine |
| E22 | Torch fault when switch on the machine |
| E23 | Torch fault during normal working process |
| E30 | Cutting torch disconnection |
| E31 | Water cooler disconnection |
| E40 | Connection problem between wire feeder and power source |
| E41 | Communication error |
17. FAQs
Coming Soon