
Shop Now
From Our Blog
-
What is a Pulse MIG? A how & why guide to Pulse MIG welding
The how, what and why guide to pulse MIG welding -
Choosing The Right Welding Fume Extractor
An easy-to-follow comparison of different fume extraction methods


User Guide - 135ST
The complete operators guide for Weldclass FORCE 135ST Stick / TIG Welder

1. Set Up
Warranty Registration:
To qualify for extended warranty, please register here within 30 days of purchase.
Work Lead:
Ensure that all connections are firmly fitted to the cable.
The work lead should be connected to the positive (+) terminal for most Stick applications*.
Earth Clamp & Lead:
Ensure that the clamp is very firmly fitted to the earth cable.
The earth lead should be connected to the negative (-) terminal for most Stick applications*.
*Refer to electrode manufacturers specifications / recommendations for correct / best polarity. Many electrodes will operate on either polarity - read more.
2. Controls & Settings
Front panel
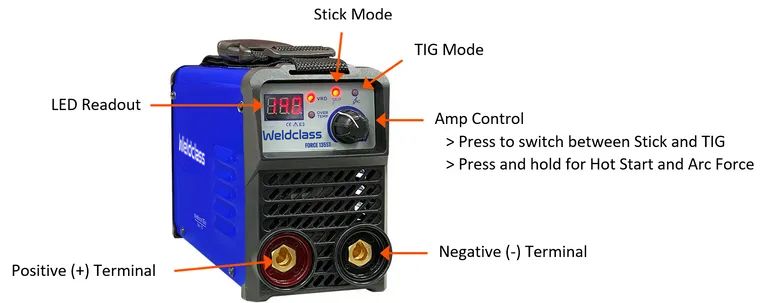
Welding Modes
Press the Amp control knob to switch between Stick and TIG. The Machine will remember your last settings when switching modes.
Adjusting Hot Start and Arc Force
Press and hold the Amp Control knob to enter Hot Start and Arc-Force settings.
Hot Start
Hot start provides extra power when the striking the arc, to counteract the initial high resistance between the electrode and workpiece. It makes igniting the electrode easier and prevents it from sticking when cold.
Adjustable from 0 – 10. 0 is Hot-Start off, 10 is maximum Arc Force (around 20-30A higher than the set welding current/amps, up to a maximum 'ceiling' of 140A).
Arc Force
Also known as ‘Dig’ or ‘Arc Control’. A Stick welder is designed to produce constant output current (CC). This means that the welding voltage varies to maintain constant current (amps), depending on the arc length, electrode type, etc. This can cause instability in some welding conditions as electrodes will have a minimum voltage they can operate with and still have a stable arc. Arc Force control boosts the welding power if its senses the welding voltage is getting too low. The
higher the arc force adjustment, the higher the minimum voltage that the power source will allow. This effect will also cause the welding current to increase.
Adjustable from 0 – 10. 0 is Arc Force off, 10 is maximum Arc Force (around 20-30A higher than the set welding current/amps). This is useful for electrode types that have a higher operating voltage requirement or joint types that require a short arc length such as out of position welds.
VRD
See section 5 below.
3. Power Supply
The 135ST is designed to operate on a 10A 240VAC power supply.
If an extension cord must be used, it should be minimum cable core size 2.0mm2 for length of up to 10m, or minimum 2.5mm2 for length up to 20m. Using extension leads of over 20m is not recommended.
This machine has a wide input power variation tolerance (~170-265V), allowing it to operate off generator power. Recommended generator size is minimum 7ka, or ideal 8+kva. A suitable quality generator should have a THD (total harmonic distortion) rating of less than 6%. Most reputable generator suppliers will be able to specify the THD ratings on their product. For more details on generator use, see: Using Generators to power Inverter Welders - your questions answered
4. TIG
In TIG mode, the 135ST is suitable for "Lift-Arc" DC TIG welding (15-130A) of mild-steel, stainless-steel, copper and chrome-molly up to a thickness of approximately 3mm.
A TIG welding torch and gas regulator is required to set up the 135ST for TIG welding.
Note that the 135ST is NOT suitable for TIG welding of aluminium, as this requires machines with AC/DC TIG function - such as the Weldclass 201T AC/DC TIG welder.
5. VRD
VRD (Voltage Reduction Device) function is disabled by default*. To have VRD activated on your machine, please contact your Weldclass distributor, or click here to email Weldclass Technical Support team.
When enabled, VRD function reduces the open-circuit voltage (OCV / U0) from 73V to a safer level of 11.7V. The machine senses when the operator is striking an arc (resistance between electrode and work piece is less than 200 Ohmns) and switches VRD off to provide full voltage / welding power. When welding stops, VRD will activate again. Whenever VRD is activated, the VRD LED light on the control panel will be illuminated.
VRD is mandatory for some work sites (especially mine sites). Whilst VRD reduces the risk of electrical hazard, striking the arc can be more challenging, especially with specialist or hard-to-run electrodes.
*Machines with first 6 digits of serial number 202212 & above have VRD disabled by default, with option to enable on request. Machines with first 6 digits of serial number prior to 202212 have VRD permanently activated / on.
6. About the 135ST
Key Features
- 140A max output
- Weighs only 2.3kg
- Super compact L250 x W95 x H140mm
- Fitted with a 10A 240V Plug
- Generator Compatible - min 7kva, ideal 8kva
- IGBT Inverter for better power efficiency and a more portable unit
- Automatic Thermal Overload protection
In the box:
- Earth Lead 3m
- Stick Lead 3m
- Shoulder Strap
- FREE Welding Gloves
Technical Data
| Description | Detail |
| Dimensions mm | L250 x W95 x H140 |
| Weight | 2.3kg |
| Power Supply | 240vAC 1-Phase |
| Standard | AS 60974.1 |
| STICK (MMA) Output / Duty Cycle (40c) |
140A @ 15% 70A @ 60% |
| TIG Output / Duty Cycle (40c) |
130A @ 25% 84A @ 60% |
| OCV |
73V (VRD on 11.3V) |
7. Safety
Safety Guidelines for Machine Operation
- Mode Switching: Never switch the machine's function modes while it is operating. Doing so can cause damage that is not covered under warranty.
- Electrode Handling: Always disconnect the electrode-holder cable before turning on the machine to prevent arcing if the electrode contacts the workpiece.
- Operator Qualifications: Ensure operators are properly trained and qualified.
Electric Shock Risks
- Live Electrical Parts: Contact with live electrical parts can lead to fatal shocks or severe burns. The electrode and work circuit remain live when the machine is on. In MIG/MAG welding, all metal parts touching the wire are also live. Ensure proper grounding and installation of all equipment.
- Installation Standards: Adhere to Australian and New Zealand standards when connecting the primary input cable.
- Precautions: Avoid contact with live electrical components. Wear dry gloves and keep the workpiece insulated from your body. Maintain cords and replace any that show wear or damage immediately.
- Safety Recommendations: Use a Residual Current Device (RCD) to detect any leakage of current.
- Weather: Must NOT weld or use the machine in Water, Rain or Snow
- EMC Filter: EMC Circuitry has been fitted to this device in accordance with IEC 60974-10
Fumes and Gases
- Health Risks: Fumes and gases from welding/cutting are hazardous. Avoid inhaling these and ensure good ventilation or wear an approved respirator in confined spaces.
- Safe Environment: Do not perform welding/cutting near operations that can create flammable vapors. Use appropriate ventilation and air-purifying respirators when working with materials that emit toxic fumes.
Arc Rays
- Protection from Rays: Arc rays can severely damage eyes and skin. Always use a welding helmet with the correct lens shade and wear protective clothing.
Fire Hazards
- Prevention: Avoid welding/cutting on closed containers to prevent explosions. Keep the area free of flammable materials and use covers for unavoidable flammable items nearby.
- Awareness: Be conscious of where welding sparks may land and keep a fire extinguisher ready.
Handling Gas Cylinders
- Storage and Handling: Keep gas cylinders secure and upright. Protect them from heat, shocks, and sparks. Never weld on pressurized cylinders.
- Safety Practices: Open cylinder valves slowly and avoid direct exposure to the escaping gas.
Other Hazards
- Magnetic Fields: Keep a distance from electromagnetic fields if you have an implanted medical device.
- Noise Exposure: Protect your hearing from high noise levels with approved ear protection.
- Hot Surfaces: Handle hot equipment with insulated gloves and allow for cooling periods after use.
- Machine Falling: Machine must secure firmly to prevent falling when placed on unstable surface.