
Shop Now
From Our Blog
-
FURY MPST Series: How-To Videos
Video guides for Weldclass FURY MPST Series MIG/TIG/Stick Pulse welding machines. -
What is a Pulse MIG? A how & why guide to Pulse MIG welding
The how, what and why guide to pulse MIG welding


Spool and Wire Feed Set Up for Weldforce 155M, 175MST & 210MST MIG Welders


Spool Hub Set-Up for 200mm (5kg) Spools
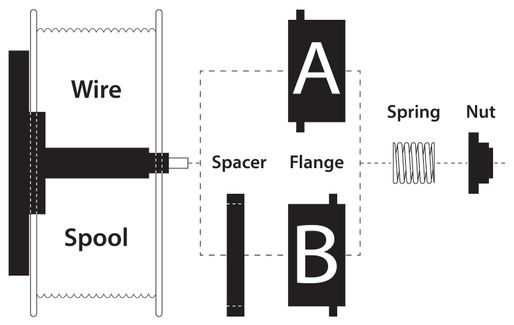
- Flange mounting options;
Note: From approx Late 2021 / early 2022, machines will be supplied with 'Spacer' ring as shown above. If your machine was not supplied with this, use option A.
A: Without Spacer. Flange orientation should be as shown above, with the 'rim' of the flange closest to the spool.
B: With Spacer. This will suit spools that are larger in width. Flange orientation should be as shown above, with the 'rim' of the flange towards the outside of the machine. - Fit spring & then screw on the retaining nut as shown above
- Set correct tension on the spool, by screwing in (or backing off) the nut. The Spool tension should be enough to brake the spool & prevent free-wheeling. Do NOT over-tighten, as this will put undue strain on the drive system.
- Depending on exact width of the spool, the nut may not screw fully onto the spool hub thread. This will not affect the performance of the spool hub system. Avoid screwing the nut in fully if this will place excessive tension on the spool.
Spool Hub Set-Up for 100mm (1kg) Spools

- Flange orientation is not critical for D100/1kg spools
- Fit spring & then screw on the retaining nut as shown above
- Set correct tension on the spool, by screwing in (or backing off) the nut. The Spool tension should be enough to brake the spool & prevent free-wheeling. Do NOT over-tighten, as this will put undue strain on the drive system.
- Depending on exact width of the spool (this can vary*), the nut may not screw fully onto the spool hub thread. This will not affect the performance of the spool hub system. Avoid screwing the nut in fully if this will place excessive tension on the spool.
*The spool hub spacer is designed to suit different international spool widths, which can vary from one country to another and/or from one brand of wire to another.
Drive Roller Alignment
Each drive roller will have two grooves for different wire sizes. Make sure that the drive roller is installed so that the groove being used is the correct size for the wire size you are using.
VERY IMPORTANT: Make certain that the wire is sitting directly & firmly inside the groove in the roller, before closing/locking the tension arm.

More Tips & Tricks | Wire Feed Troubleshooting Guide